WE ARE HIRING ...


DeltaMax V-1.0 Overview
This guide walks through the complete DeltaMax workflow — from generating synthetic credit bureau data, running data quality checks (anomaly detection, T-test, PSI, mismatches), to uploading the outputs to Google Cloud Storage and loading them into BigQuery for reporting and visualization in Looker Studio.
It provides the commands and structure required to run each step end-to-end and adapt it to your project setup.
This guide walks through the complete DeltaMax workflow and is organized into three main sections:
- ● Data Generation – creating synthetic credit bureau datasets for the previous and current month.
- ● Data Quality Checks – running anomaly detection, T-tests, PSI analysis, data type mismatch checks etc.
- ● BigQuery Integration – uploading outputs to Google Cloud Storage, loading them into BigQuery, and preparing them for reporting and visualization in Looker Studio.
Step-1 : Search for DeltaMax on Google Cloud Marketplace

1. You will need to create a project on Google Cloud
2. The project should be associated with your corporate billing account.
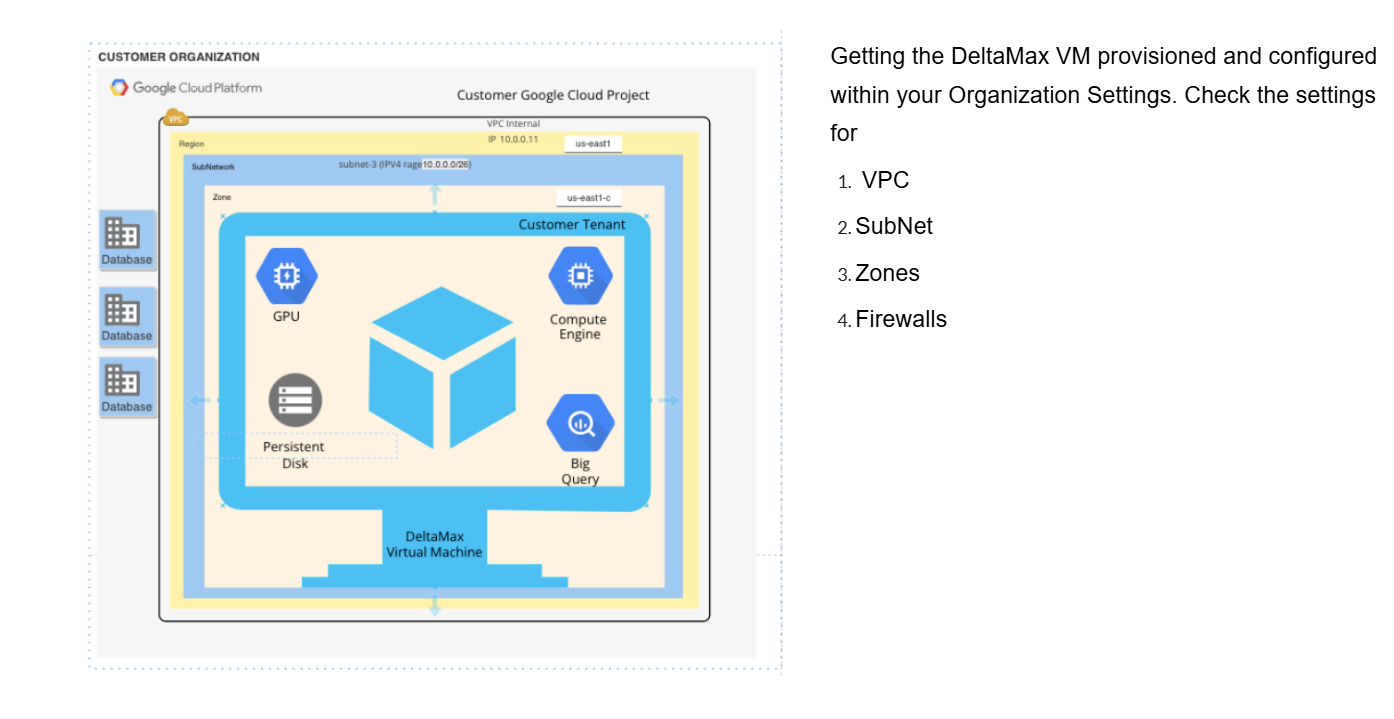
Step-2 : Deploy the DeltaMax Virtual Machine in your Organization
Step-3 : Ensure that VM is updated, if required install python3-full latest version, venv

Data Generation
Step-4 : DeltaMax_synthetic_data_generator.py
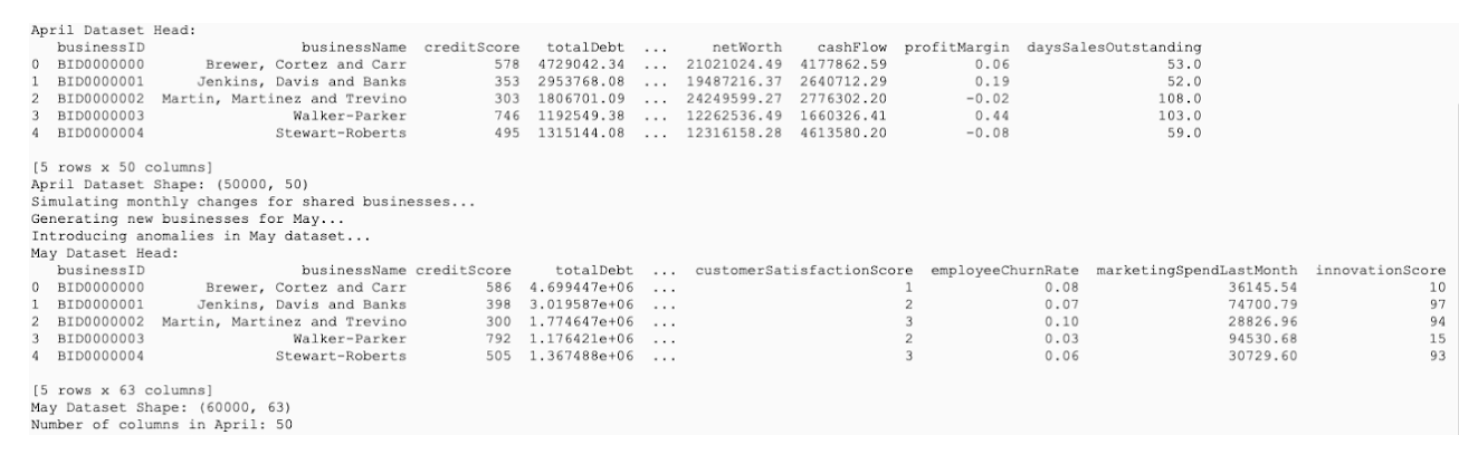
Generates synthetic datasets for the previous month (April) and the current month (May), where the May dataset intentionally includes injected anomalies that will be used for training and validation.

Step-5 : Install jupyter nbcovert to convert python note books to python text files for running on CLI environment and pandas for running python moudles

Data Quality Check
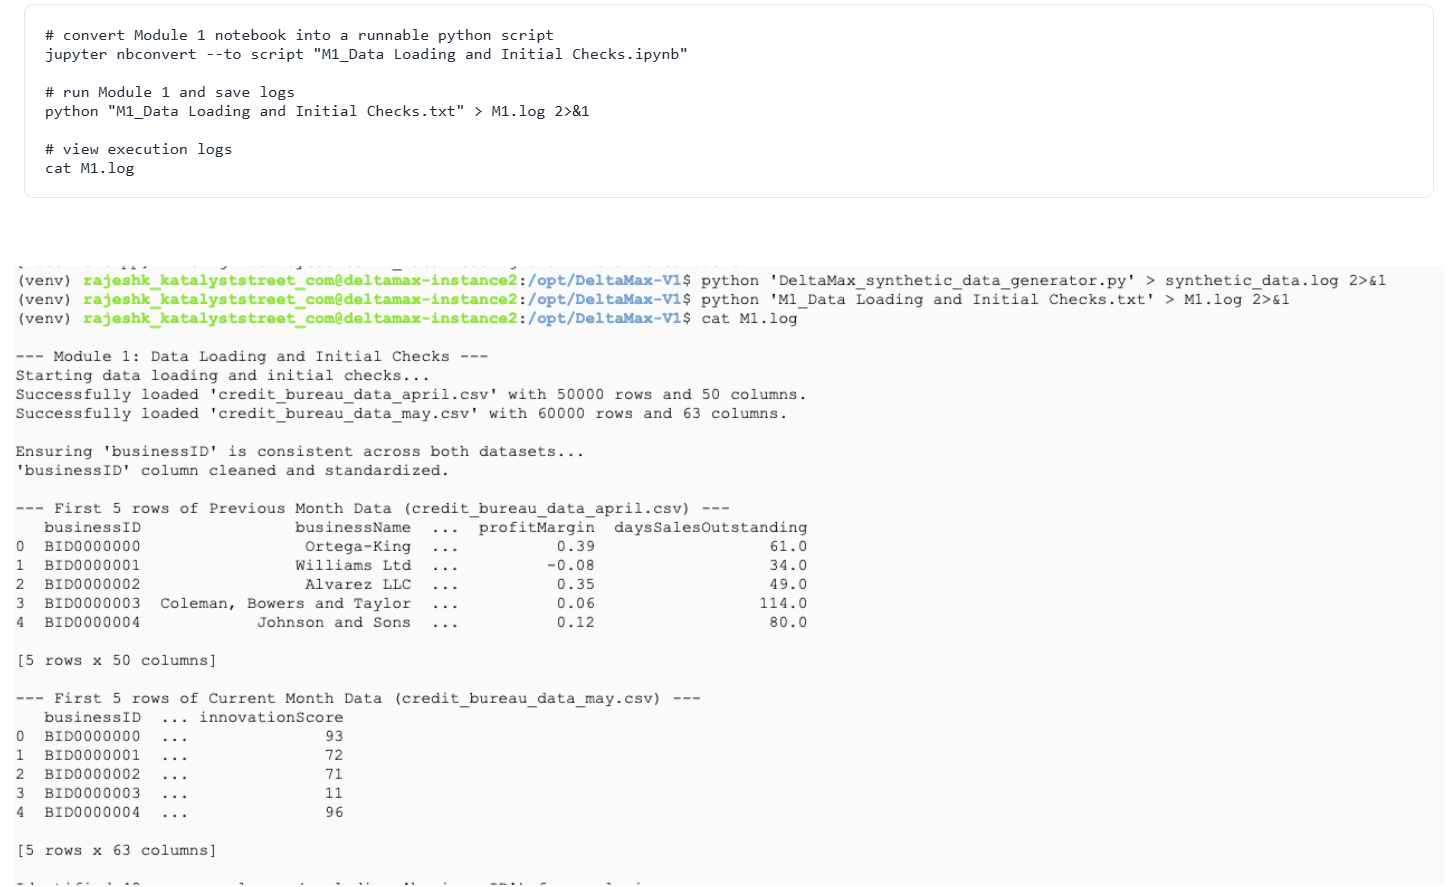
Step-6 : M1 – Data Loading & Initial Checks
This step loads the generated datasets, standardizes the businessID, and verifies that both monthly files share common columns. It confirms the data is ready for the next DeltaMax modules. It confirms that the data is successfully loaded and ready to be passed to the next stages of the DeltaMax pipeline.
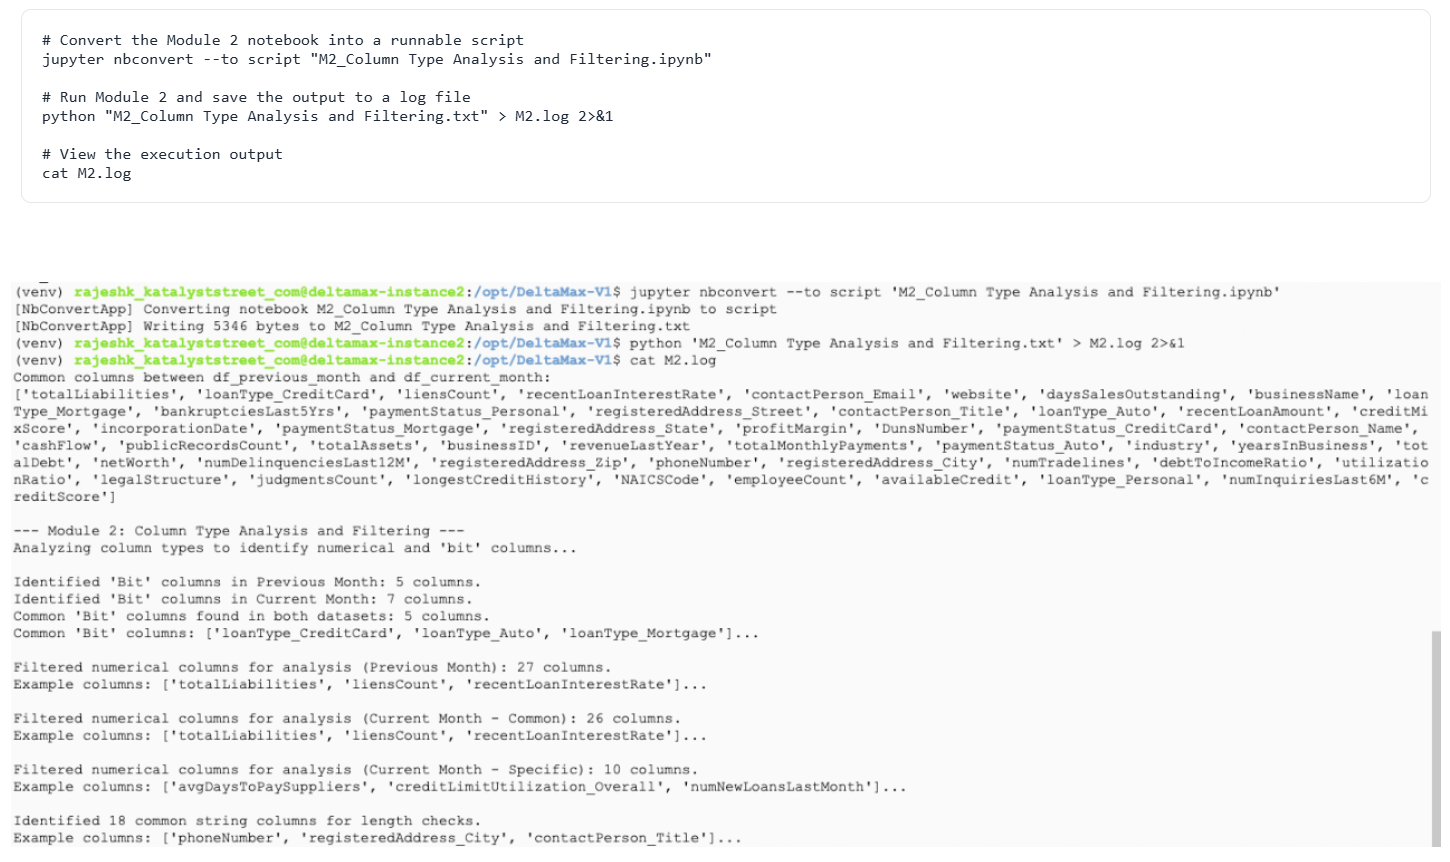
Step-7 : M2 – Column Type Analysis & Filtering
This step identifies numeric, boolean (bit), and string columns and prepares the correct columns for anomaly analysis.
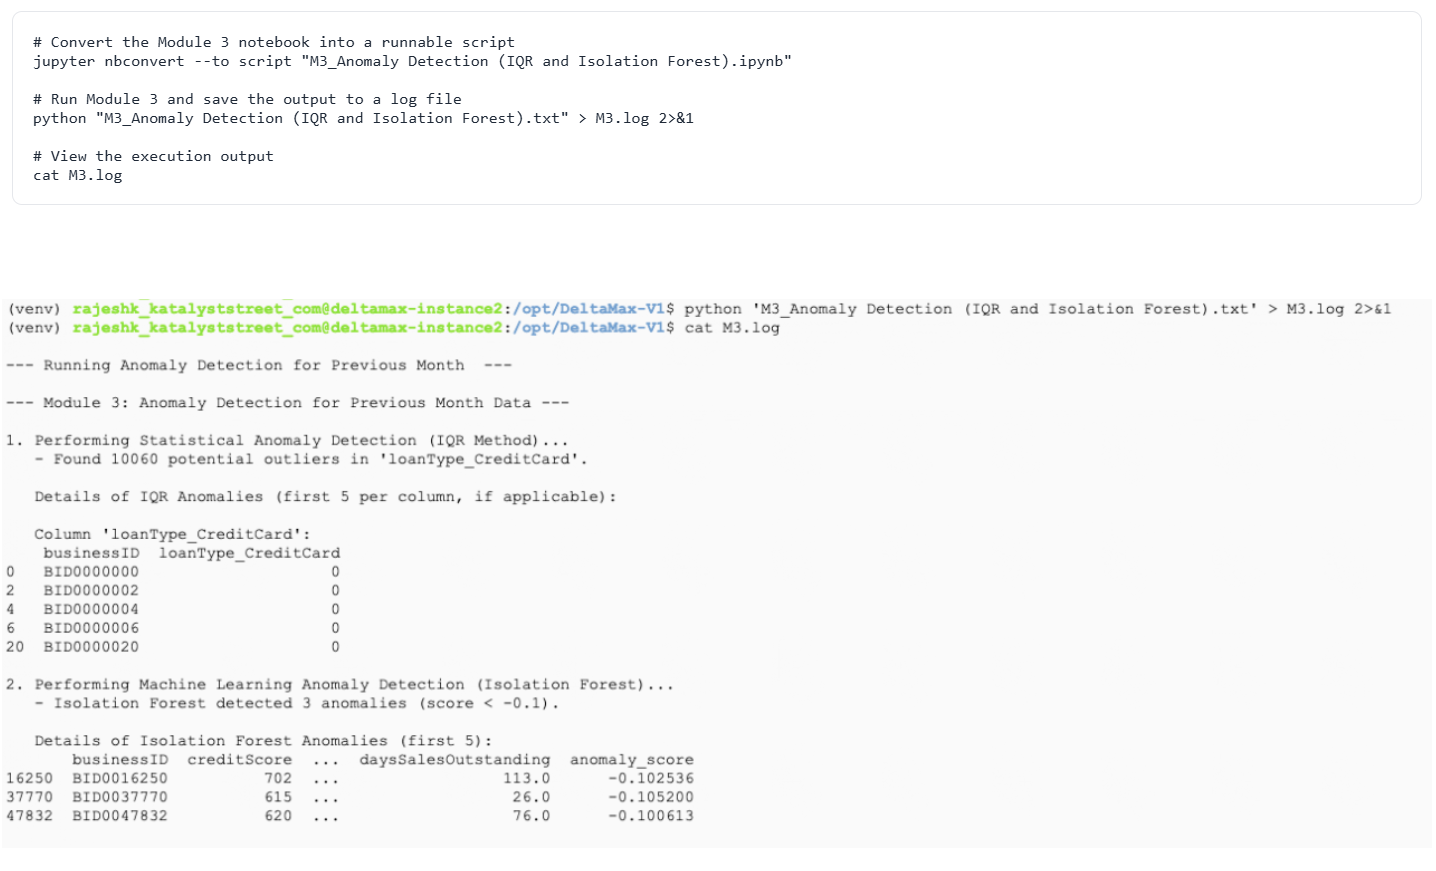
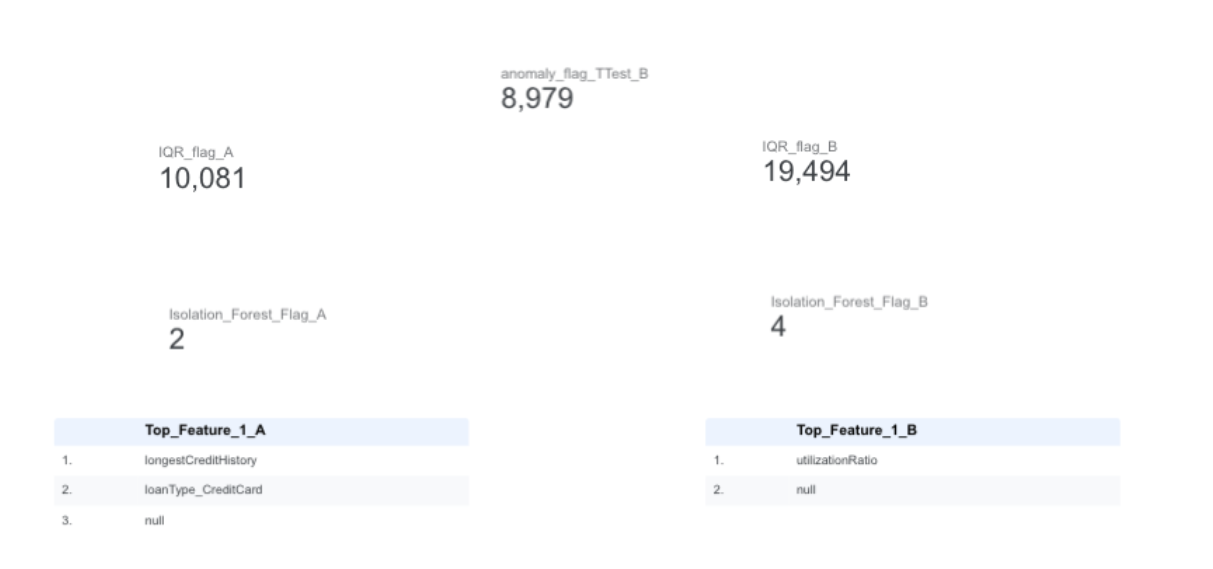
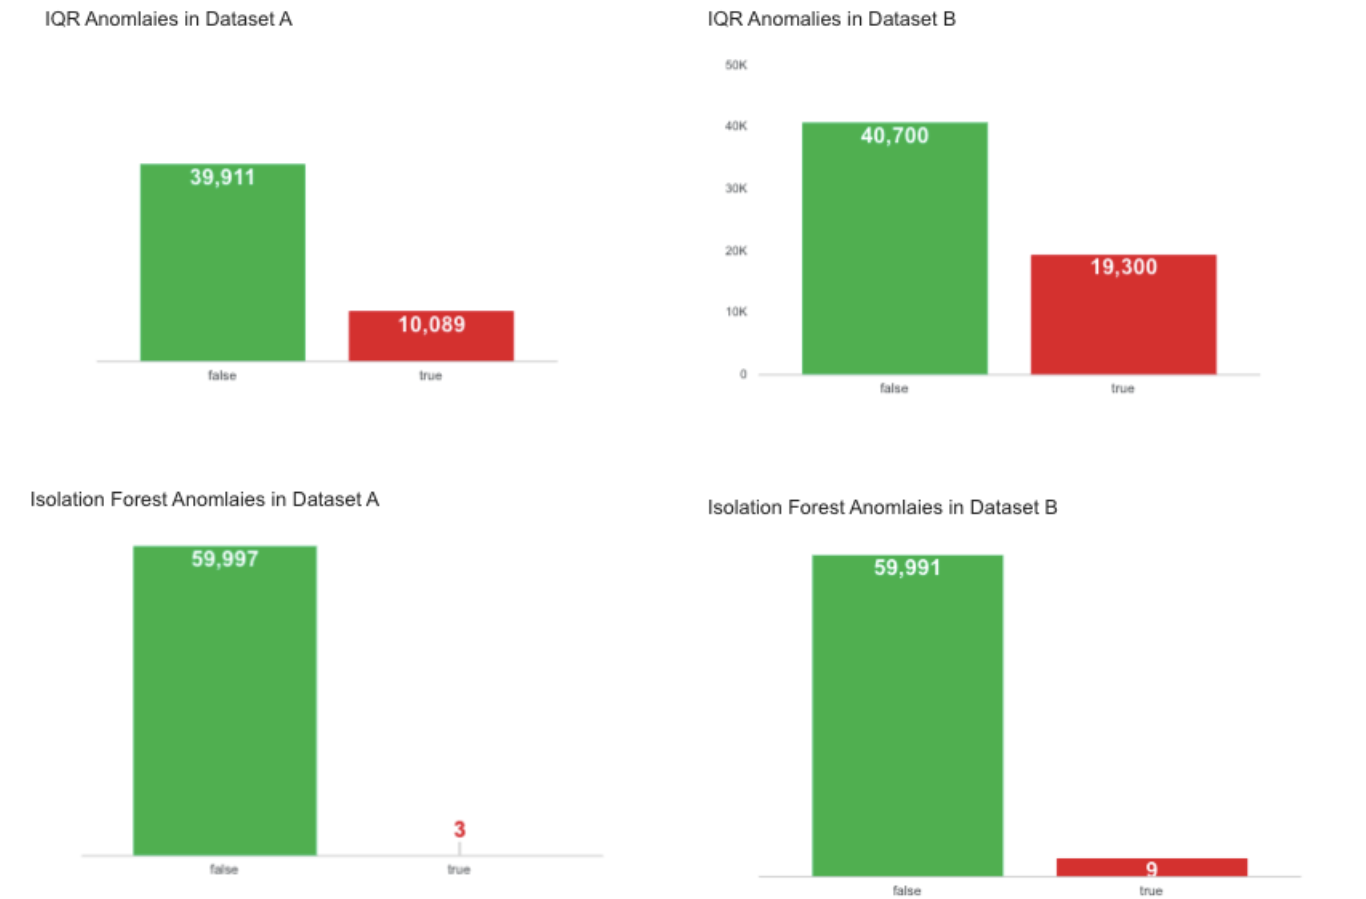
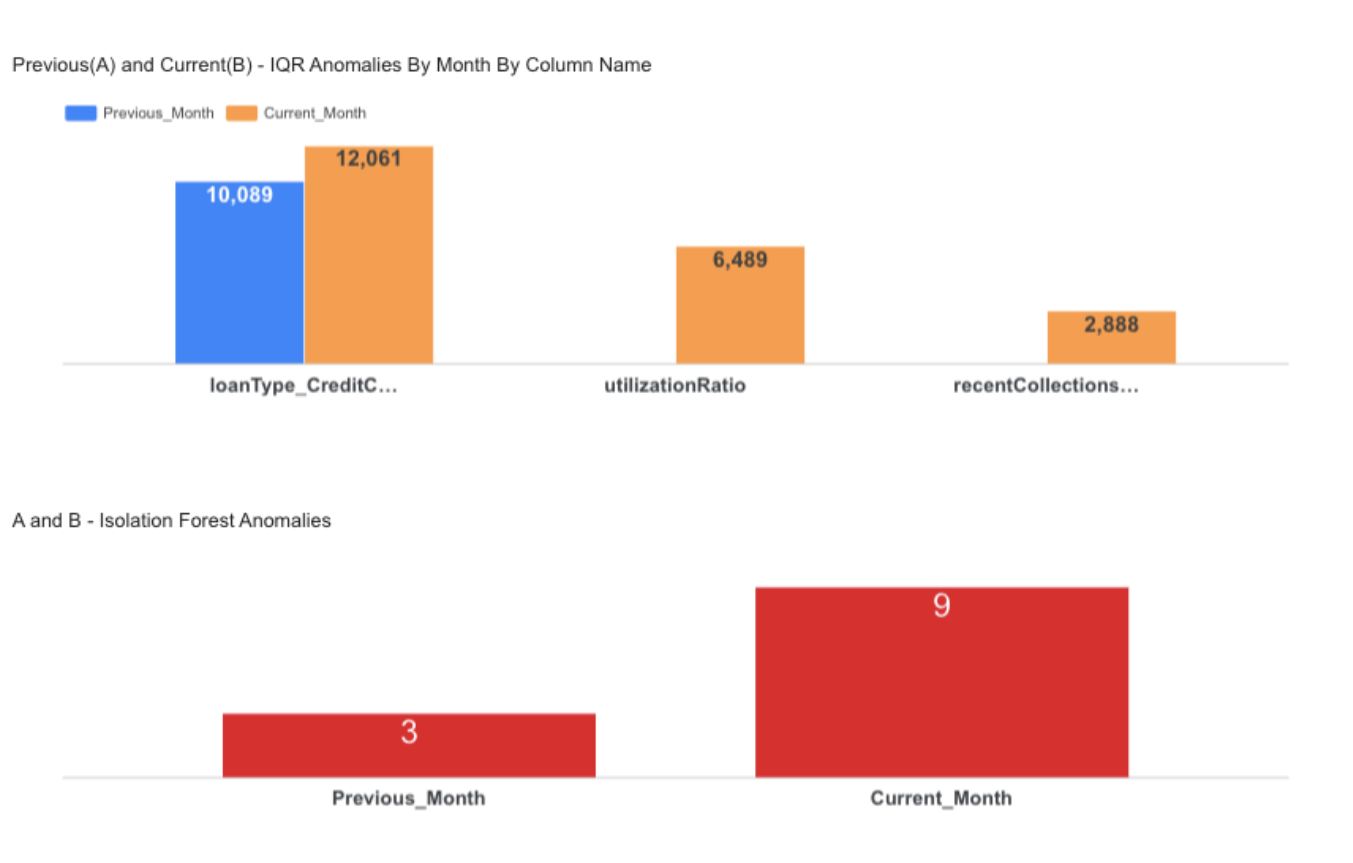
Step-8 : M3 – Anomaly Detection (IQR + Isolation Forest)
Detects statistical and ML-based anomalies in the dataset.
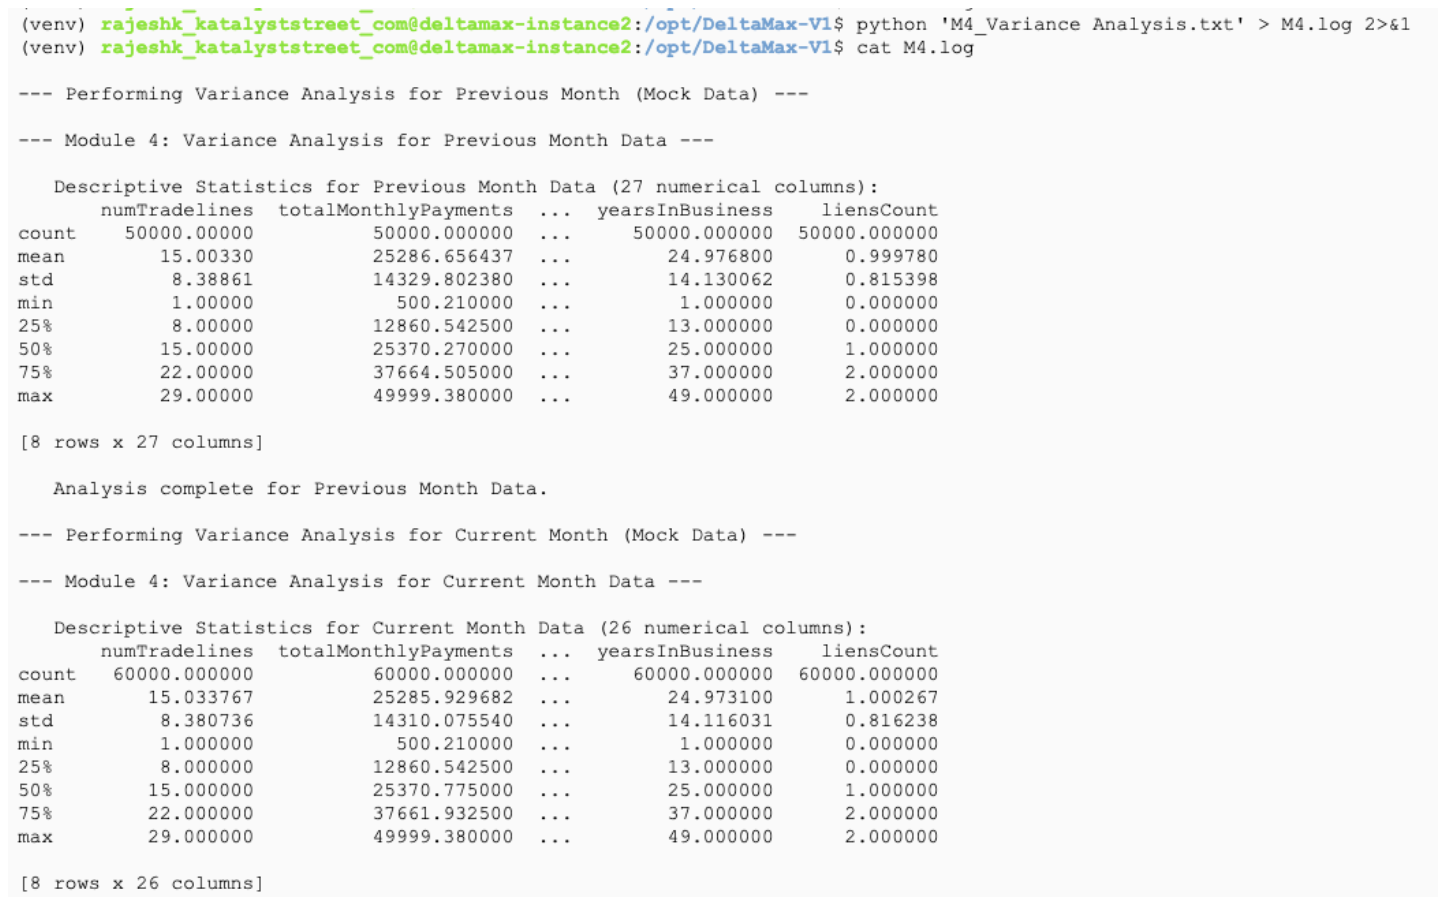
Step-9 : M4 – Variance Analysis
Generates descriptive statistics to understand data distribution and month-to-month variation.

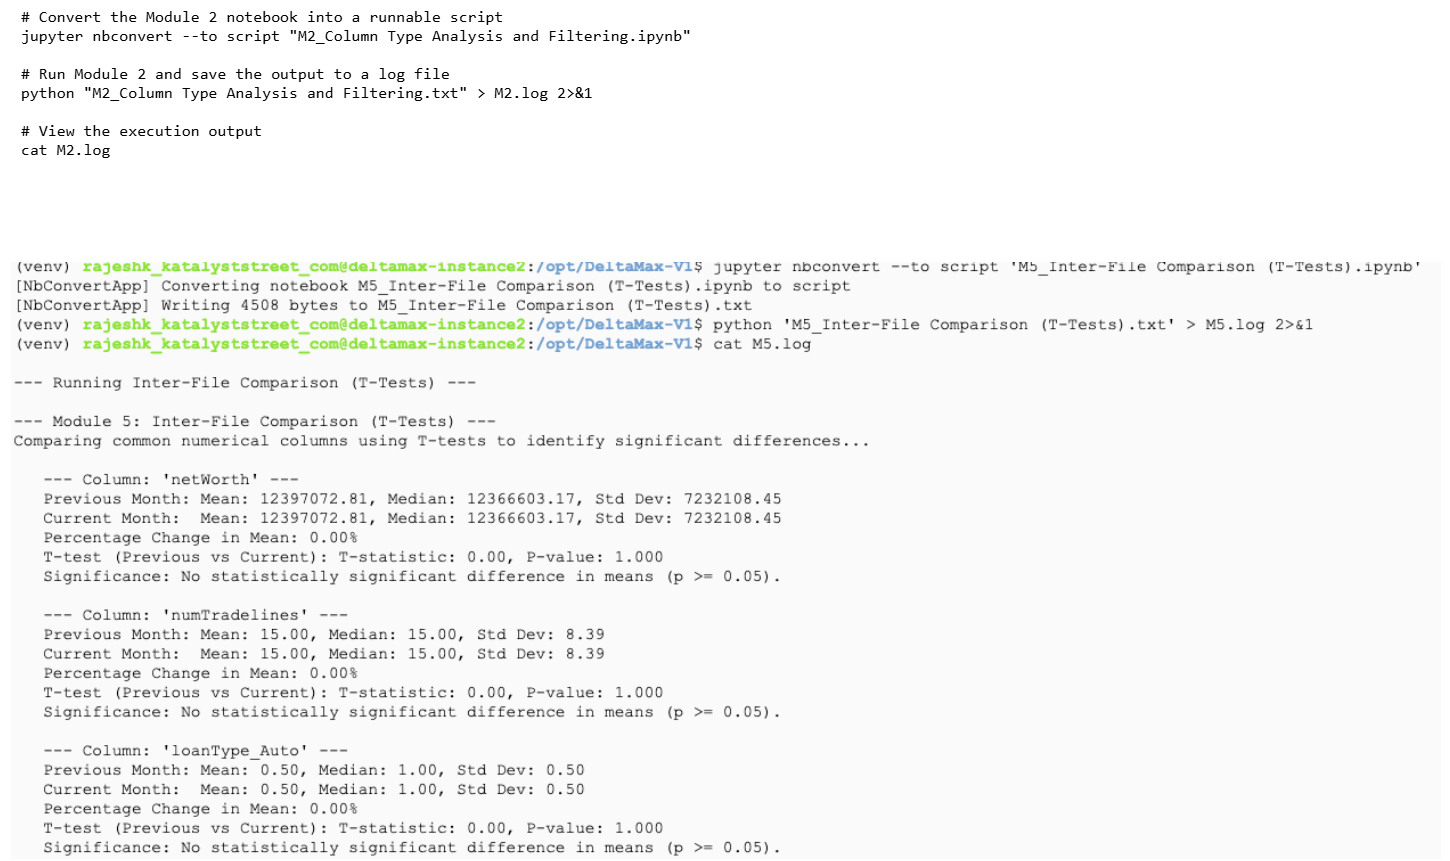
Step-10 : M5 - Inter-File Comparison(T-Tests)
Compares common numerical columns between months using T-tests to detect statistically significant mean changes.
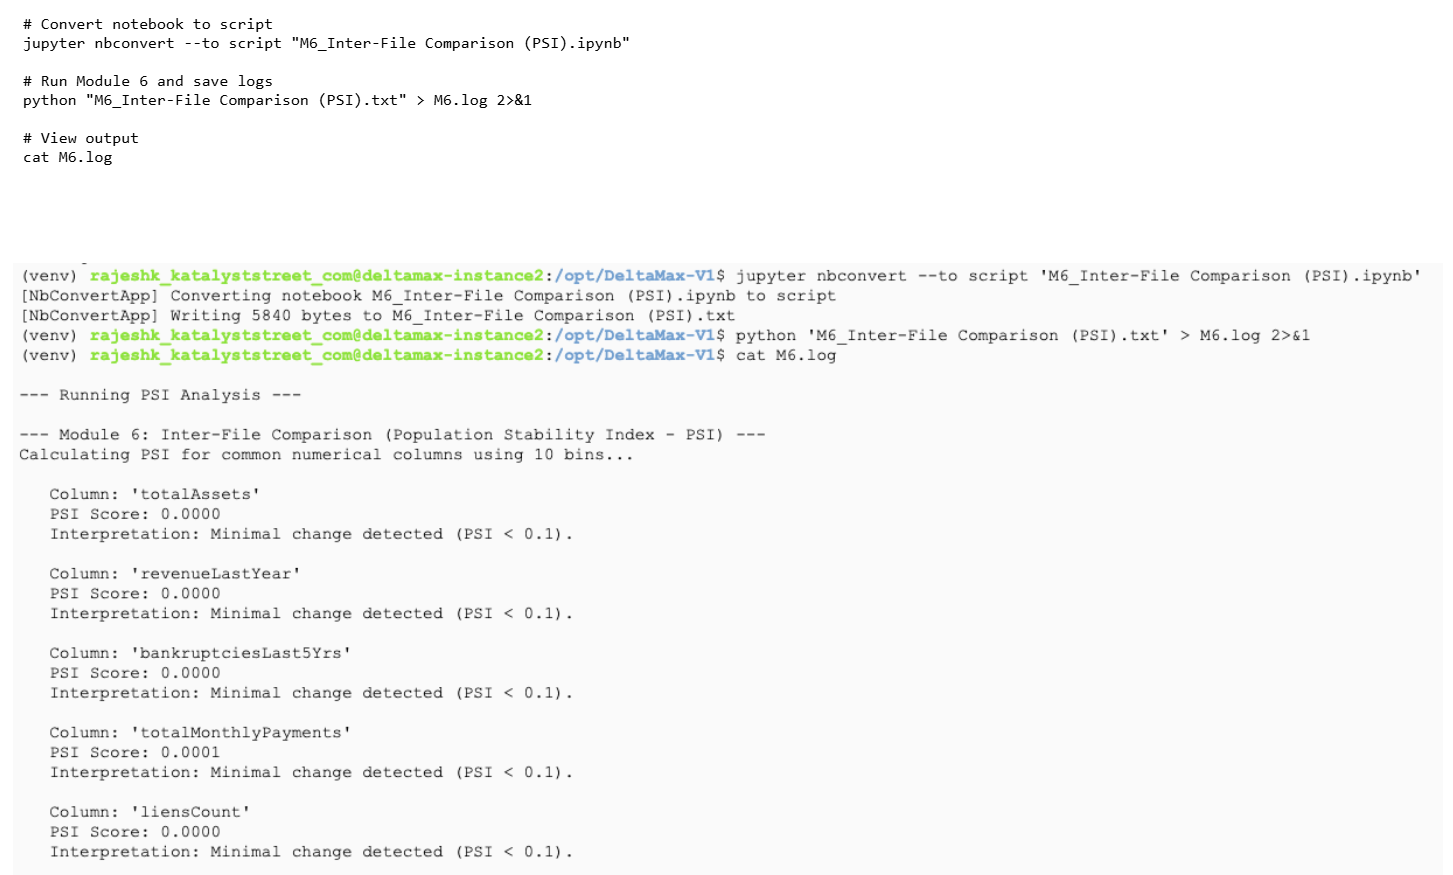
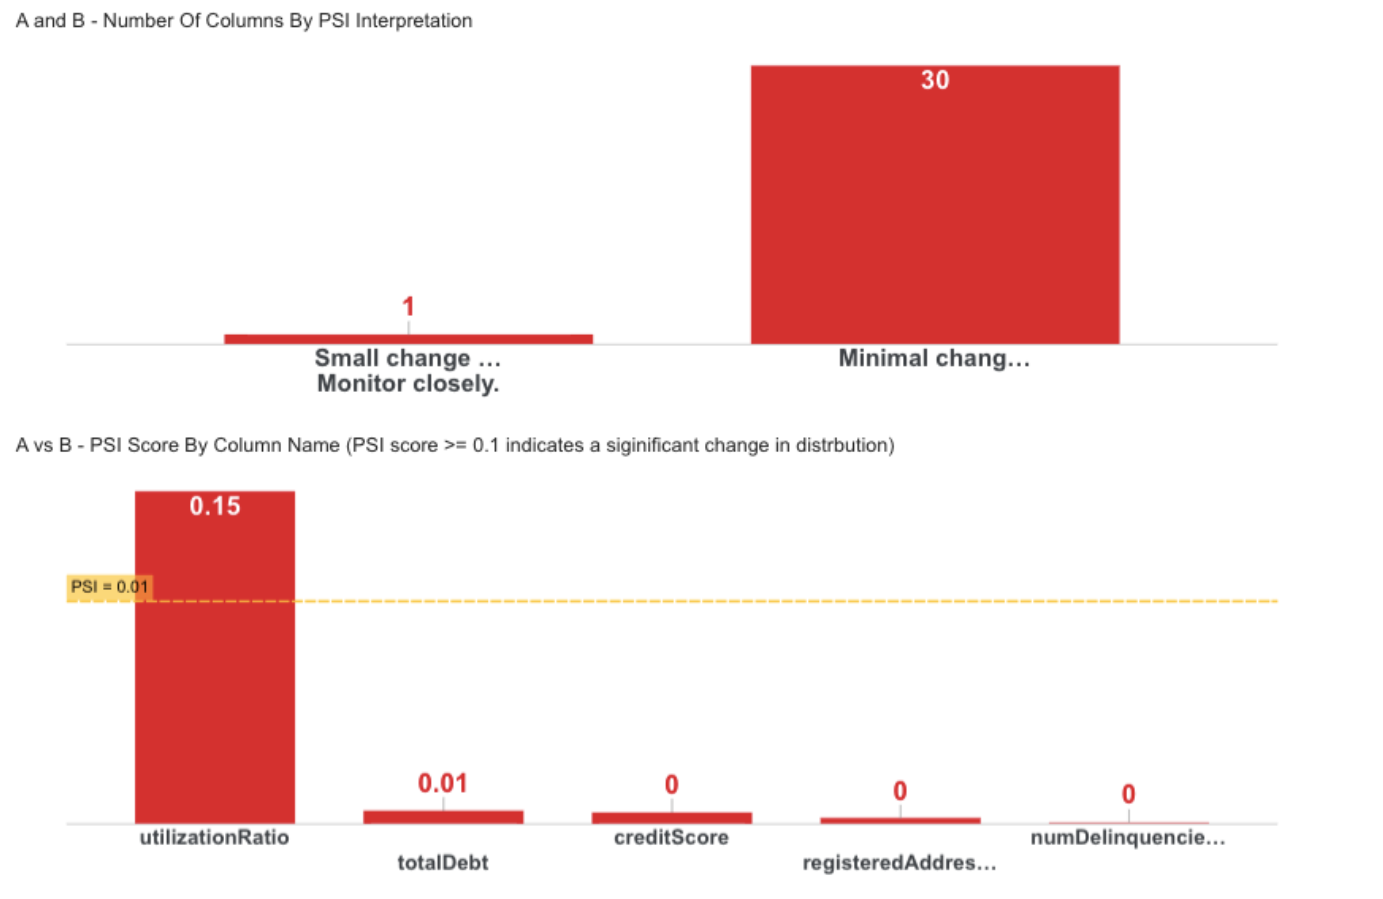
Step-11 : M6 - Inter-File Comparison(PSI)
Calculates Population Stability Index (PSI) to measure distribution shifts between months.
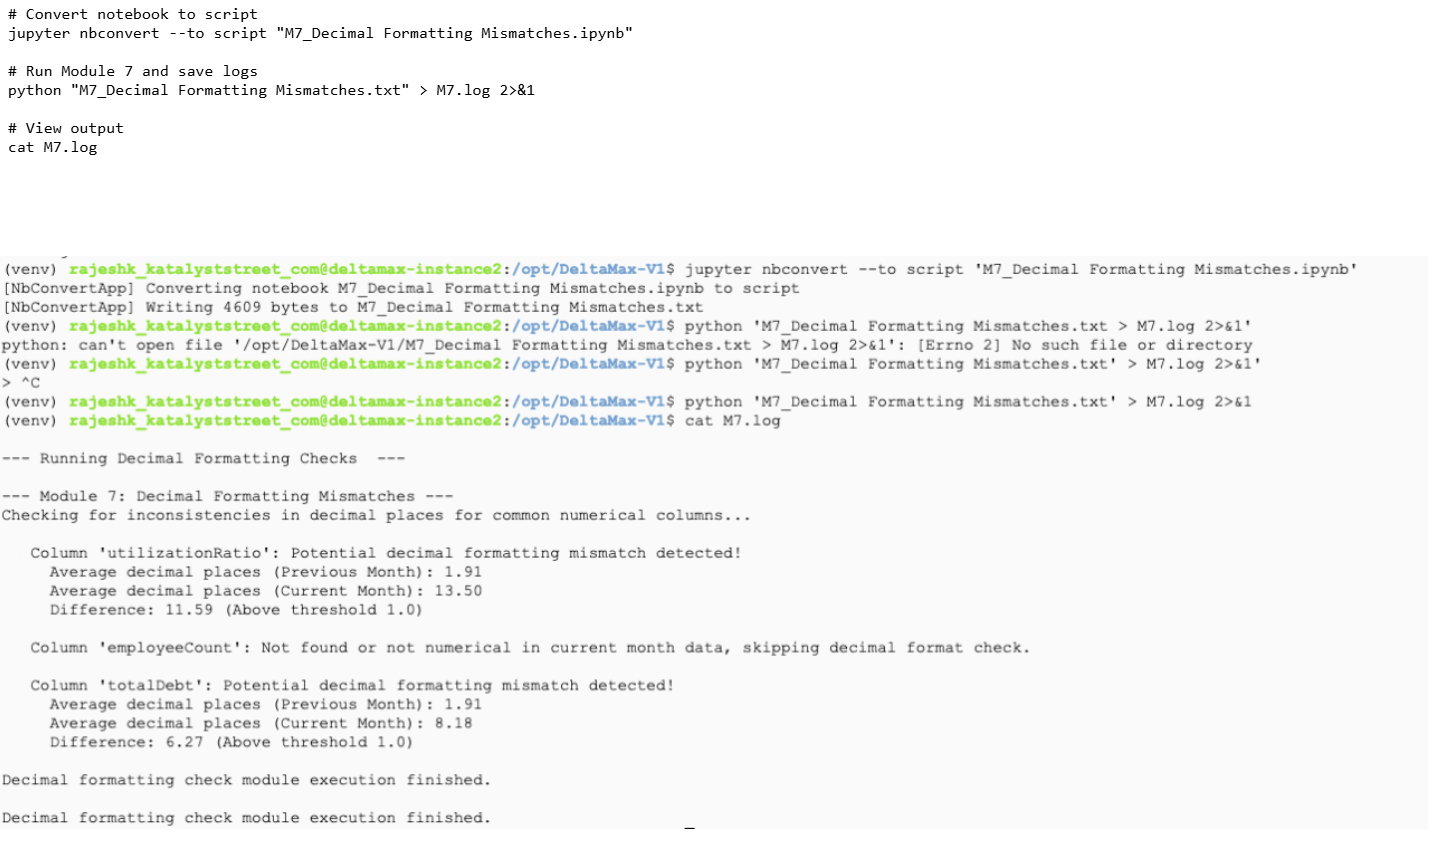
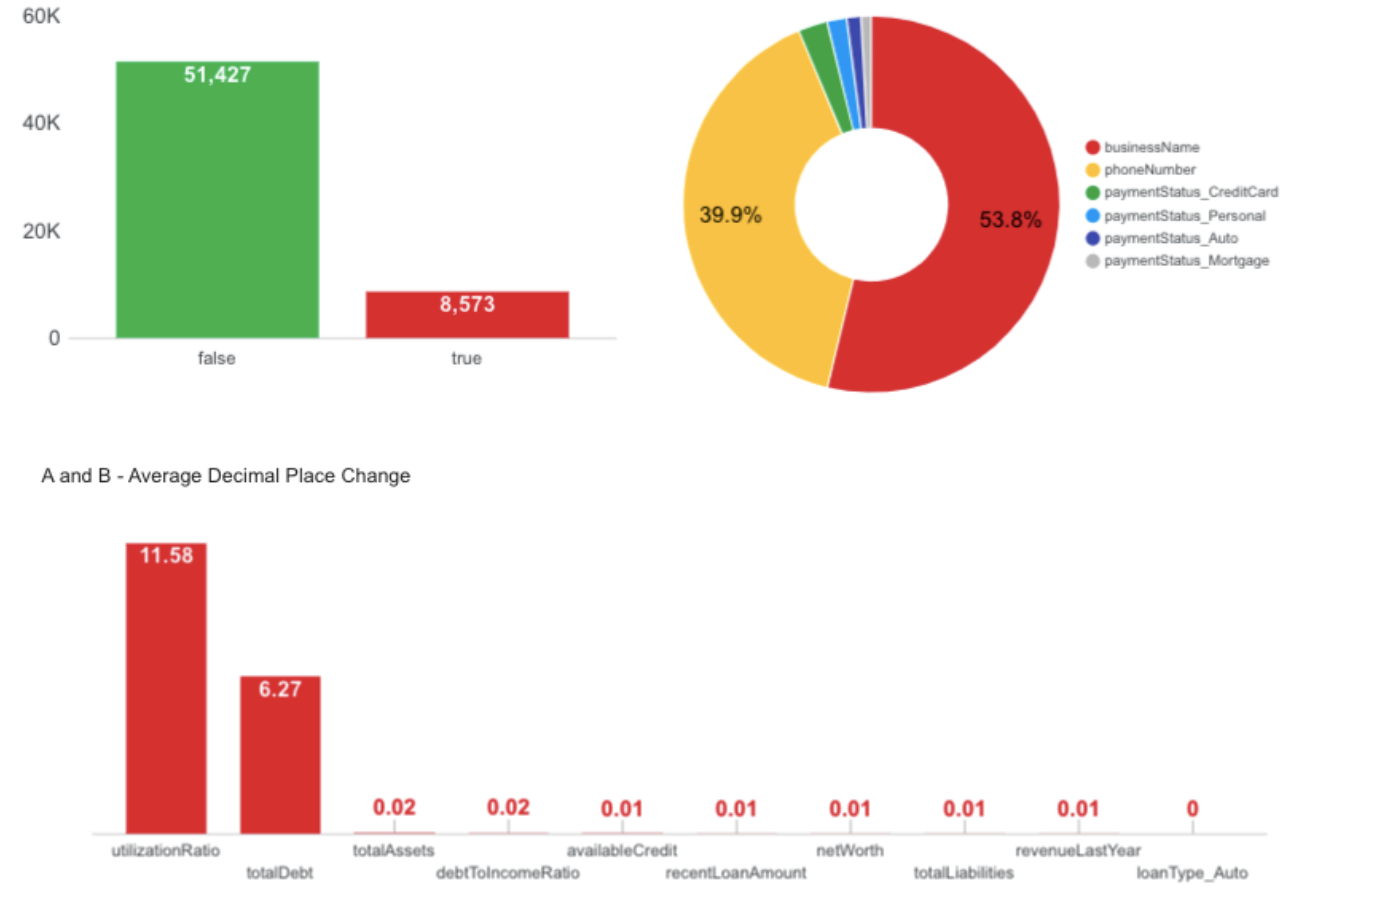
Step-12: M7 - Decimal Formatting Mismatches
Checks for inconsistencies in decimal precision across common numerical columns.
Step-13: Optional Run M8_Bit field changes (Skipping this step)
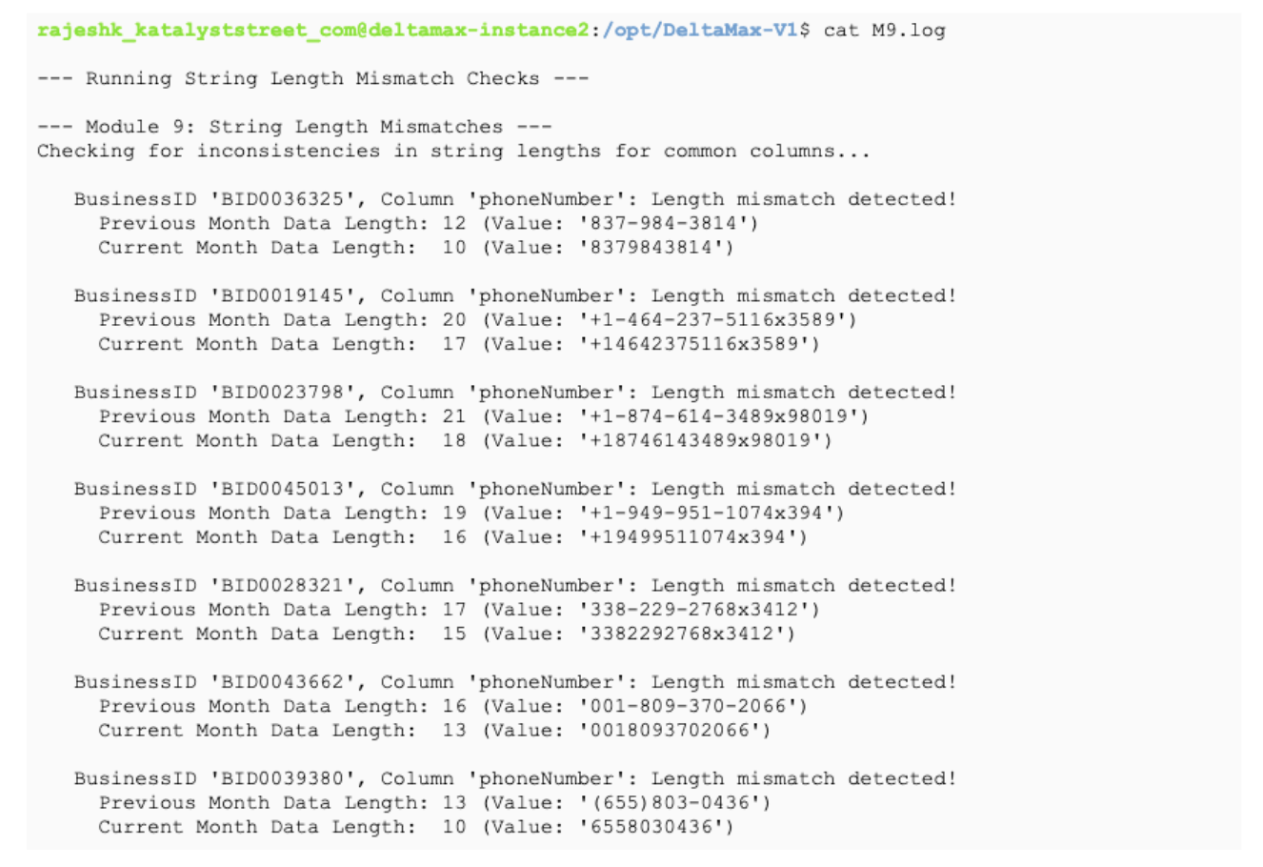
Step-14: M9 - String Length Mismatches
Detects inconsistencies in string lengths between previous and current datasets and saves the results to a log file.
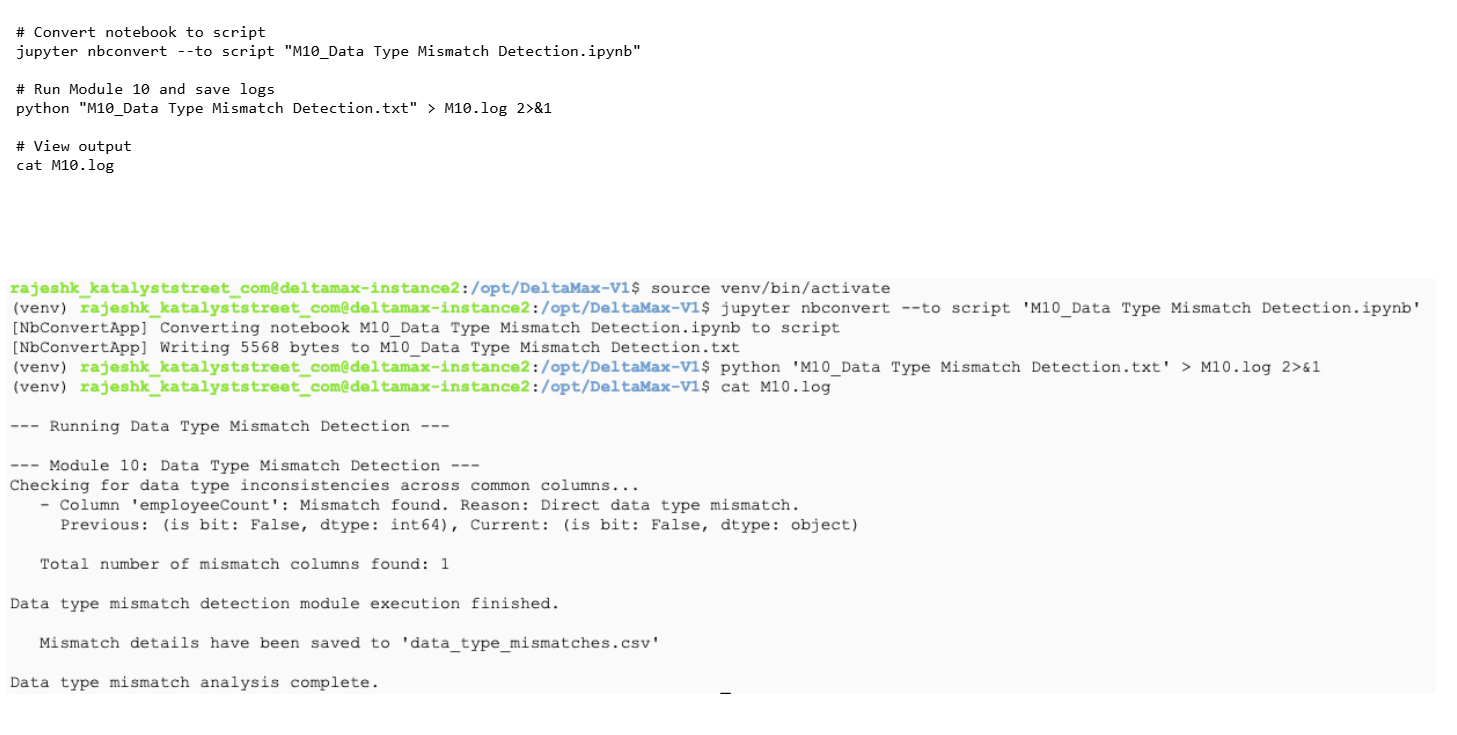
Step-15: M10 - Data Type Mismatch Detection
Identifies data type inconsistencies between previous and current datasets and logs the results.
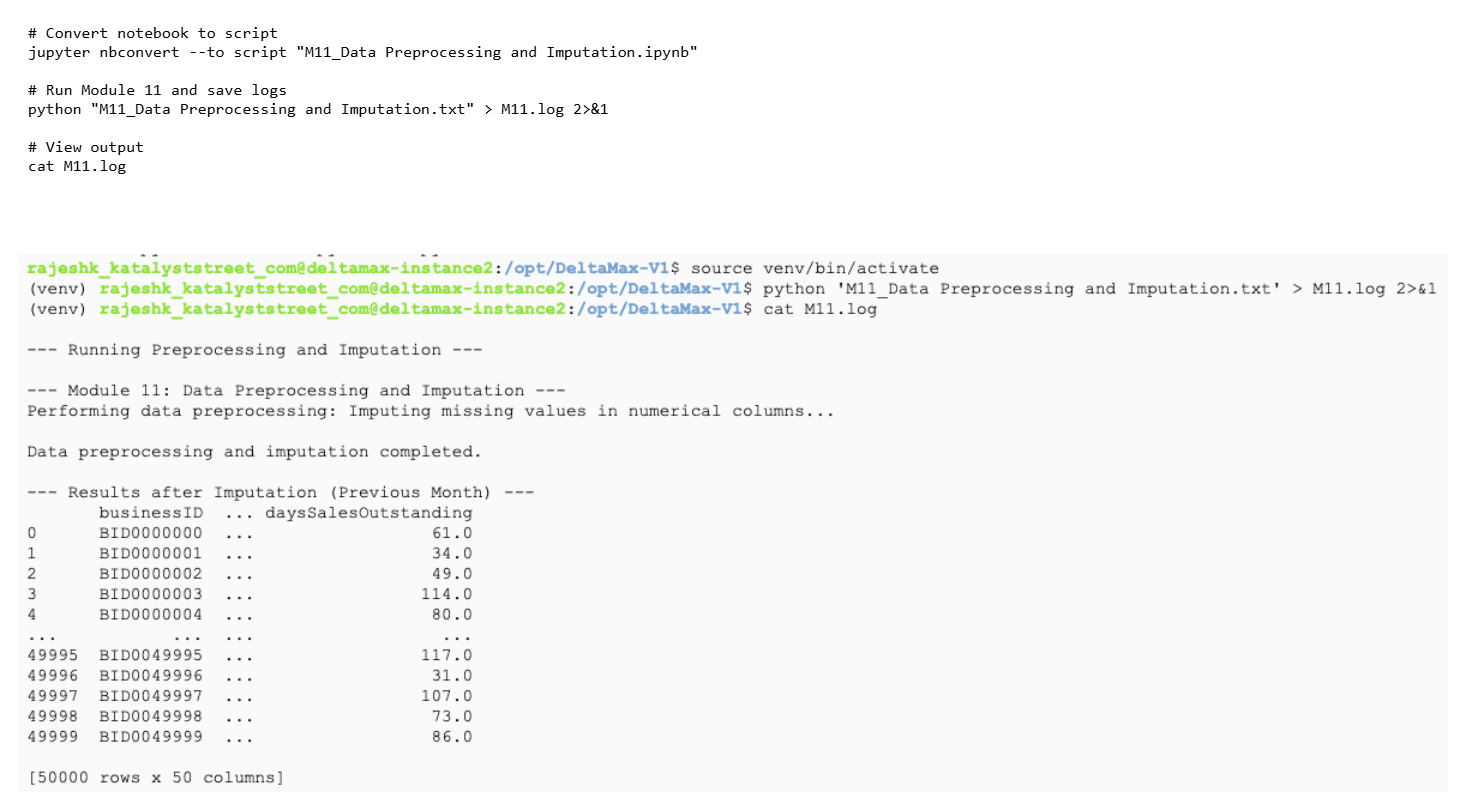
Step-16: M11 - Data Preprocessing and Imputation
preprocesses data and fill missing numeric values using imputation.
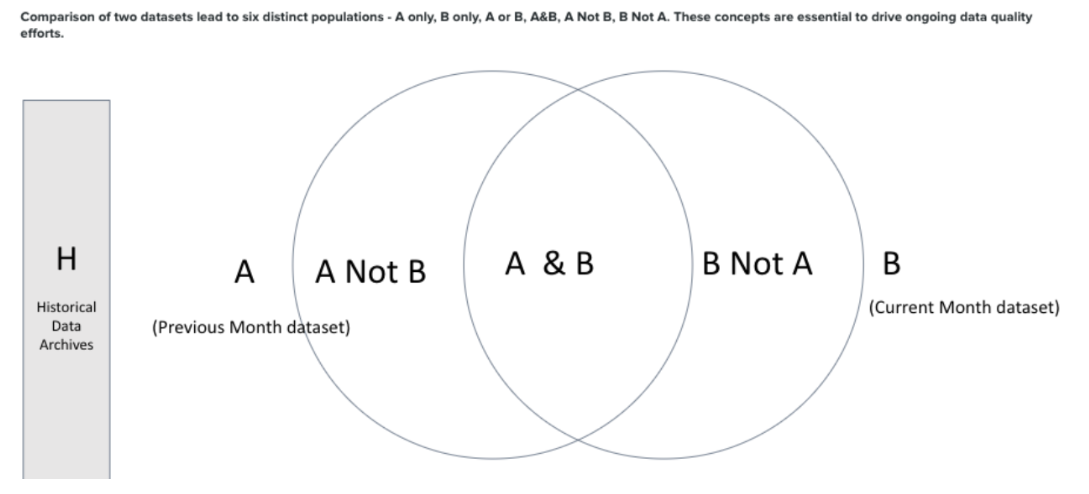
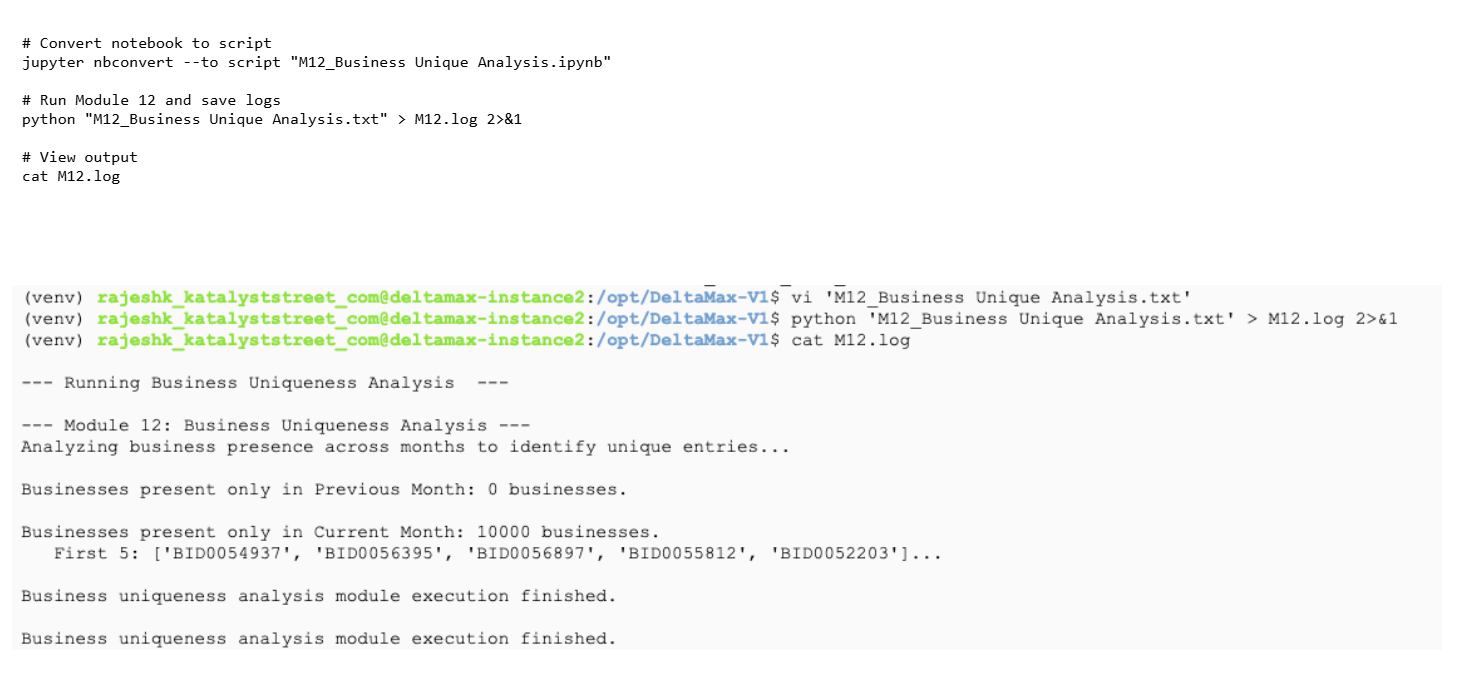
Step-17: M12 - Business Unique Analysis
Runs the Business Uniqueness module to compare previous vs current month data and identify businesses appearing in only one dataset.
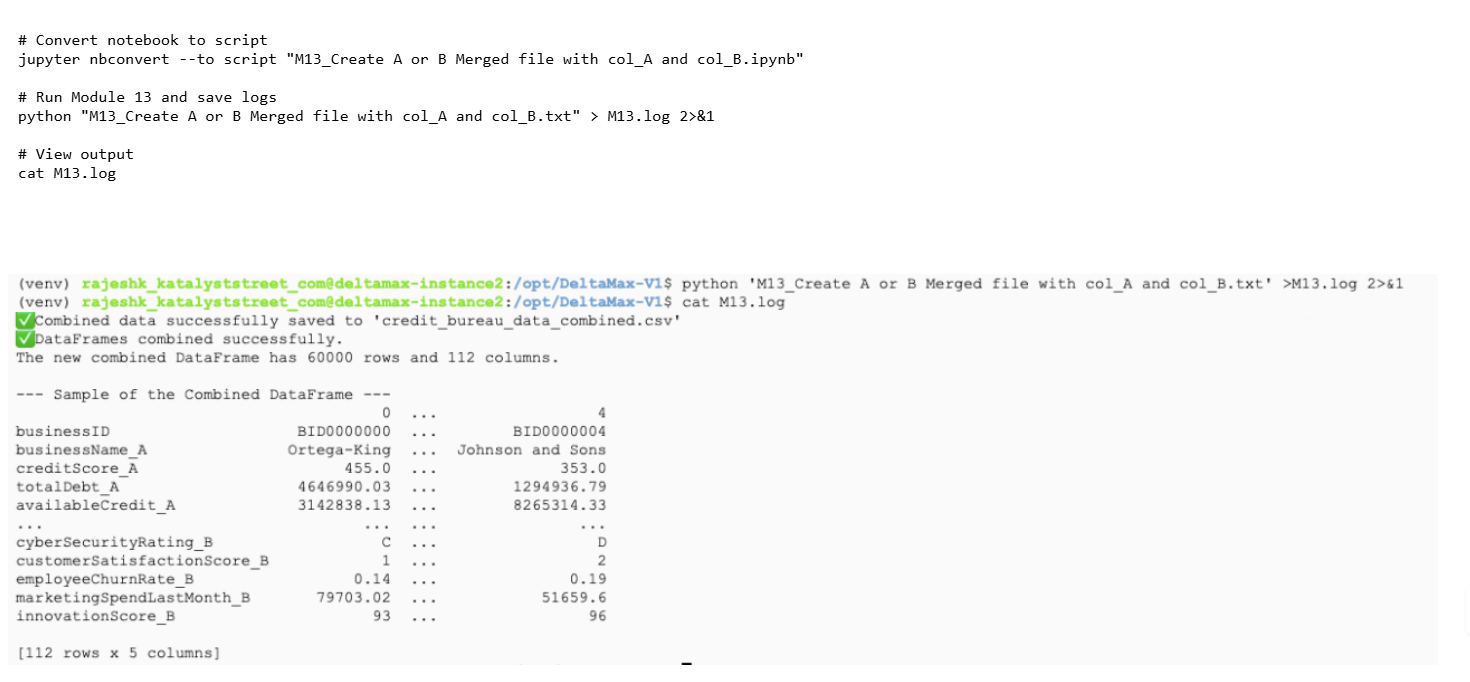
M13 - Create A or B Merged file with col_A and col_B
Merges Dataset A and Dataset B into a single combined file using common keys and saves the merged dataset.
Google Cloud Storage & BigQuery Integration
Step-19: Create a gcloud storage and load the csv files
Note: You can modify the destination table names as needed based on your project naming conventions before loading the data into BigQuery.
Create bucket
gcloud storage buckets create gs://synthetic_cb_cli-deltamax-v1
Upload generated CSV files to GCS
gcloud storage cp /opt/DeltaMax-V1/credit_bureau_data_april.csv gs://synthetic_cb_cli-deltamax-v1/
gcloud storage cp /opt/DeltaMax-V1/credit_bureau_data_may.csv gs://synthetic_cb_cli-deltamax-v1/
gcloud storage cp /opt/DeltaMax-V1/anomalies_april.csv gs://synthetic_cb_cli-deltamax-v1/
gcloud storage cp /opt/DeltaMax-V1/cb_may_with_T-Test_anomalies.csv gs://synthetic_cb_cli-deltamax-v1/
gcloud storage cp /opt/DeltaMax-V1/data_type_mismatches.csv gs://synthetic_cb_cli-deltamax-v1/
gcloud storage cp /opt/DeltaMax-V1/credit_bureau_data_combined.csv gs://synthetic_cb_cli-deltamax-v1/
gcloud storage cp /opt/DeltaMax-V1/data_type_mismatches.csv gs://synthetic_cb_cli-deltamax-v1/
gcloud storage cp /opt/DeltaMax-V1/A_or_B_with_anomalies.sql gs://synthetic_cb_cli-deltamax-v1/
gcloud storage cp /opt/DeltaMax-V1/PSI_Changes_20250815_225600.csv gs://synthetic_cb_cli-deltamax-v1/
Step-20: Verify GCP configuration
gcloud storage ls gs://synthetic_cb_cli-deltamax-v1
gcloud config list
Step 21: Create BigQuery Dataset
bq mk synthetic_credit_bureau_cli_v1
bq ls
Step 22 — Load CSV files into BigQuery tables
Load April dataset
bq load \
--source_format=CSV \
--skip_leading_rows=1 \
--autodetect \
synthetic_credit_bureau_cli_v1.cb_april \
gs://synthetic_cb_cli-deltamax-v1/credit_bureau_data_april.csv
Load May dataset
bq load \
--source_format=CSV \
--skip_leading_rows=1 \
--autodetect \
synthetic_credit_bureau_cli_v1.cb_may \
gs://synthetic_cb_cli-deltamax-v1/credit_bureau_data_may.csv
Load Anomaly dataset
bq load \
--source_format=CSV \
--skip_leading_rows=1 \
--autodetect \
synthetic_credit_bureau_cli_v1.anomalies_april \
gs://synthetic_cb_cli-deltamax-v1/anomalies_april.csv


bq load \
--source_format=CSV \
--skip_leading_rows=1 \
--autodetect \
synthetic_credit_bureau_cli_v1.cb_may_with_T_Test_anomalies \
gs://synthetic_cb_cli-deltamax-v1/cb_may_with_T-Test_anomalies.csv


bq load \
--source_format=CSV \
--skip_leading_rows=1 \
--autodetect \
synthetic_credit_bureau_cli_v1.data_type_mismatches \
gs://synthetic_cb_cli-deltamax-v1/data_type_mismatches.csv
Step 23 — Run SQL to create anomaly analysis tables
Update project ID inside SQL files before running.
Create merged anomaly table
bq query --use_legacy_sql=false < A_or_B_with_anomalies.sql
Run monthly anomaly queries
bq query --use_legacy_sql=false < anomalies_april.sql

bq query --use_legacy_sql=false < anomalies_may.sql

 Step-24 :   Load the Big Query Tables to Looker and create reports and Visualizations as needed  Step-24:   Reach out to Katalyst Street Professional Services for Custom Visualizations and Reports


- Get Started
- Careers
- Contact Us
- Updates
- Blogs